Import Existing vCenter
Importing a vCenter infrastructure into vOneCloud can be carried out easily through the Sunstone Web UI. Follow the next steps to import an existing vCenter as well as any already defined VM Template and Networks.
You will need the IP or hostname of the vCenter server, as well as an administrator credentials to successfuly import resources from vCenter.
Step 1. Sunstone login
Log in into Sunstone as vOneCloud, as explained in the previous section.
Step 2. Acquire vCenter Resources
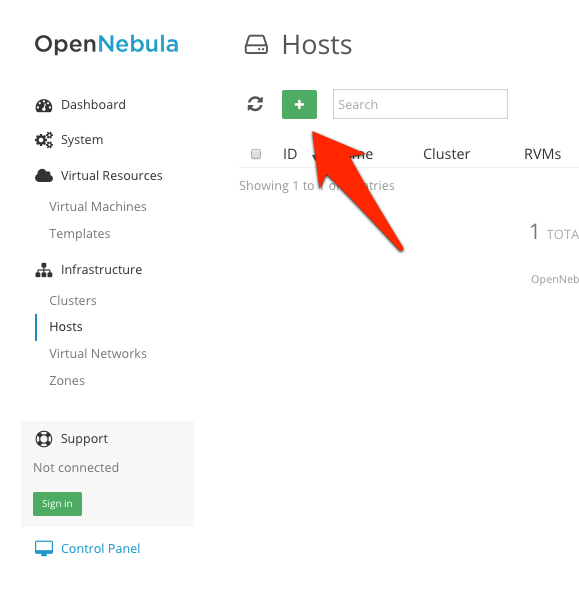
In Sunstone, proceed to the Infrastructure --> Hosts tab and click on the “+” green icon.
Warning
vOneCloud does not currently support spaces in vCenter cluster names
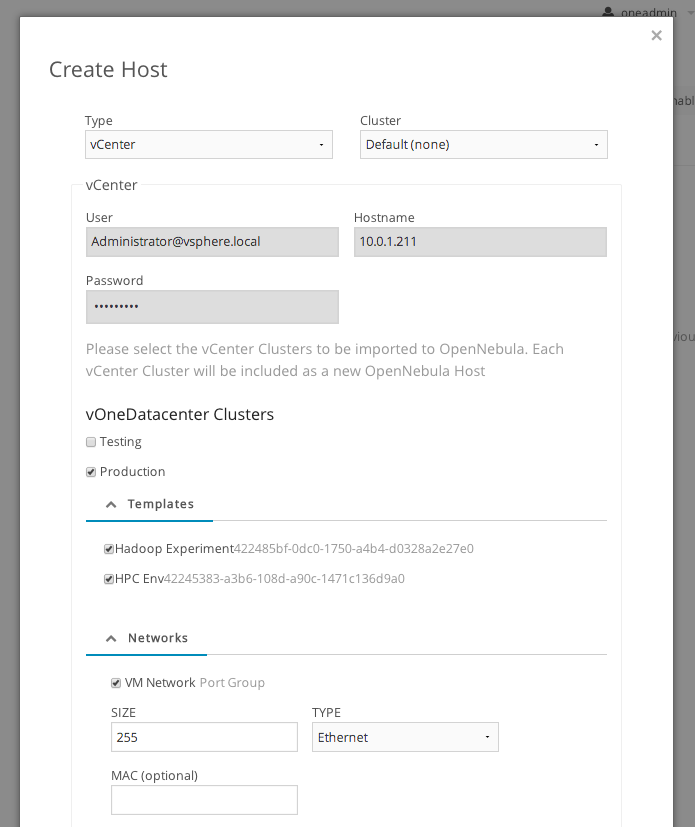
In the dialog that pops up, select vCenter as Type in the dropdown. You now need to fill in the data according to the following table:
| Hostname | vCenter hostname (FQDN) or IP address |
| User | Username of a vCenter user with administrator rights |
| Password | Password for the above user |
Note
Running VMs panel won’t be filled if the vCenter cluster is not imported. To import running VMs from a Cluster, the vCenter cluster needs to be imported first as a vOneCloud host.
After the vCenter cluster is selected in Step 2, a list of vCenter VM Templates and both Networks and Distributed vSwitches will be presented to be imported into vOneCloud. Select all the Templates, Networks and Distributed vSwitches you want to import, and vOneCloud will generate vOneCloud VM Template and Virtual Networks resources representing the vCenter VM templates and vCenter Networks and Distributed vSwitches respectively.
Additionally, these vOneCloud VM templates can be edited to add information to be passed into the instantiated VM. This process is called Contextualization.
Also, Virtual Networks can be further refined with the inclusion of different Address Ranges. This refinement can be done at import time, defining the size of the network one of the following supported Address Ranges:
- IPv4: Need to define at least starting IP address. MAC address can be defined as well
- IPv6: Can oprionllty define starting MAC adddress, GLOBAL PREFIX and ULA PREFIX
- Ethernet: Does not manage IP addresses but rather MAC addresses. If a starting MAC is not provided, vOneCloud will generate one.
The networking information will also be passed onto the VM in the Contextualization process.
Regarding the vCenter VM Templates and Networks, is important to take into account:
- vCenter VM Templates with already defined NICs that reference Networks in vCenter will be imported without this information in vOneCloud. These NICs will be invisible for vOneCloud, and therefore cannot be detached from the Virtual Machines. The imported Templates in vOneCloud can be updated to add NICs from Virtual Networks imported from vCenter (being Networks or Distributed vSwitches).
- We recommend therefore to use VM Templates in vCenter without defined NICs, to add them later on in the vOneCloud VM Templates
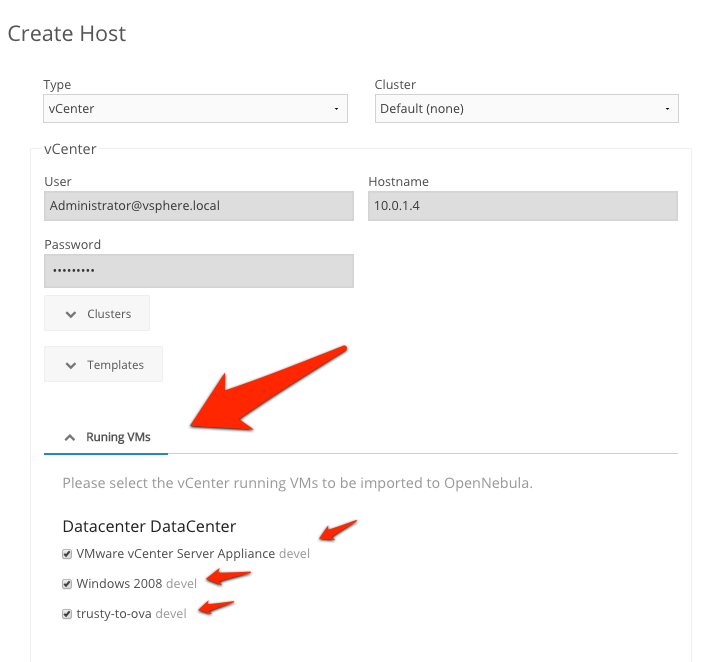
(Optional) Step 3. Import vCenter Running Virtual Machines / Reacquire VM Templates and Networks
If the vCenter infrastructure has running Virtual Machines, vOneCloud can import and subsequently manage them. The process involves using the same dialog as in Step 2, which will now present the running VMs for the vCenter clusters already imported in vOneCloud. To import running vCenter VMs:
- Proceed to the Infrastructure --> Hosts tab and click on the “+” green icon. Select vCenter as Type in the dropdown and fill in the credentials and the IP or hostname of vCenter.
- You will now see running vCenter VMs that can be imported in vOneCloud. Select the VMs that need to be imported one and click import button.
- After the VMs are imported you can operate on their lifecycle, asign them to particular users, attach or detach network interfaces, create snapshots, etc. All the funcionality that vOneCloud supports for regular VMs is present for imported VMs.
Note
The vCenter VM Templates, Networks, Distributed vSwitches and running Virtual Machines can be imported regardless of their position inside VM Folders, since vOneCloud will search recursively for them.
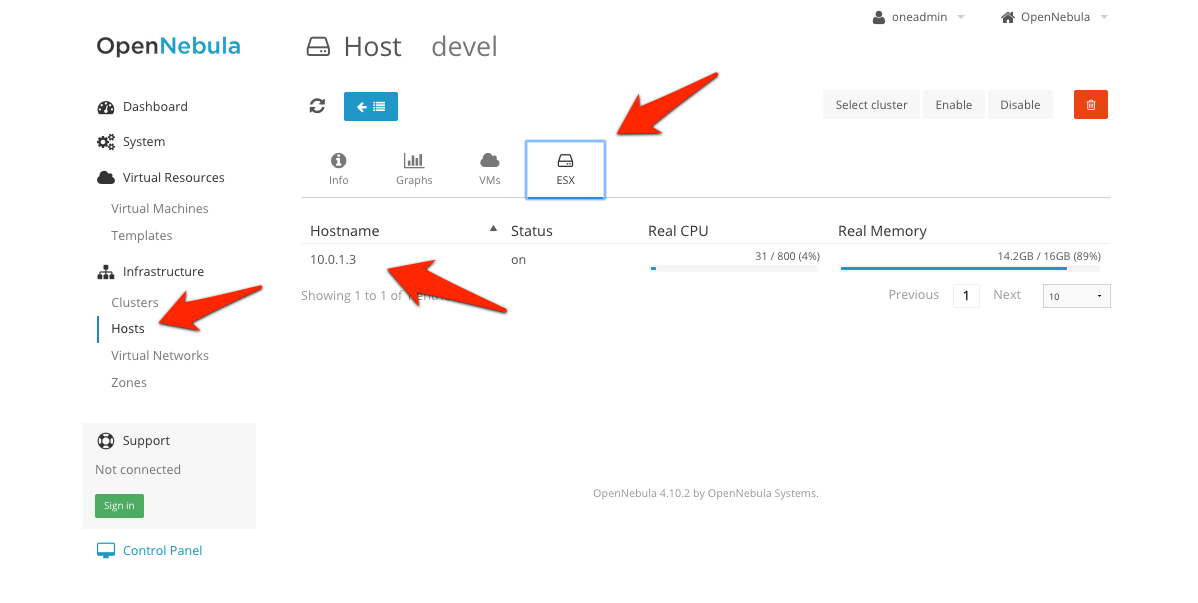
Step 4. Check Resources
Now it’s time to check that the vCenter import has been succesful. In Infrastructure --> Hosts check vCenter has been imported, and if all the ESX hosts are available:
Note
Take into account that one vCenter cluster (with all its ESX hosts) will be represented as one vOneCloud host.
Step 5. Instantiate a VM Template
Everything is ready! Now vOneCloud is prepared to manage Virtual Machines. In Sunstone, go to Virtual Resources --> Templates, select one of the templates imported in Step 2 and click on Instantiate. Now you will be able to control the lifecycle of the VM.
More information on available operations over VMs here.